lualine.nvim Part Ⅱ
今年もよろしくね🤗
このまま未来に突き進んでいくのも良いんですが、ちょっと心残りがありました。
もちろんlualine.nvimです。
2023年早々、いきなり過去に戻ってしまいますが、lualine.nvimのカスタマイズから初めます❗
…まあ、たった数週間なんですけどね😮 この程度なら “時速 88 マイル” も “1.21 ジゴワット” も必要ないでしょう。
改めて明記するんですが、このサイトに記載されているカスタマイズは “完全に” わたしの好みで作ってあるし、 あくまでもそれらに対してコメントしていくってだけなので、「汲み取れるものがあったら組み込んでもらえれば〜」ぐらいの感じです。
…と、言うことで❗
いよいよ あのシーンまで戻っていきます…。
いよいよ これから
きみの ものがたりの つづきだ❗
ゆめと ぼうけんと❗
neovimの せかいへ❗
レッツ ゴー❗
… … … …
Hey, CaP…, you read me…?
(キャップ…、聞こえるか…?)
…It’s nvim Trainer. Can you hear me…?
(…nvimトレーナーだ。聞こえるか…?)
…❗
I’m back. …I’m back from the future!!
(わたしは戻ってきたんだ。…未来から戻ってきたんだ!!)
On your radar.
君の視界にいるよ。
options
ここからが本番です。頑張っていきましょう❗
まずはベースとなる設定を2つ。
separators
SEPARATORS

lualine defines two kinds of separators:

lualine は2種類のセパレータを定義しています。

- `section_separators`   - separators between sections
                           セクション間のセパレータ。

- `component_separators` - separators between the different components in sections
                           セクション内の異なるコンポーネントを区切るセパレータ
options = {
section_separators = { left = '', right = '' },
component_separators = { left = '', right = '' }
}
Here, left refers to the left-most sections (a, b, c), and right refers to the
right-most sections (x, y, z).

ここで、left は左端のセクション(a, b, c)を、right は右端のセクション(x, y, z)を意味します。
まあ細かいことは後にしましょう。これはもう例示されている通りにやっちゃいます😆
require('lualine').setup {
options = {
section_separators = { left = '', right = '' },
component_separators = { left = '', right = '' },
},
}
globalstatus
globalstatus = false,       -- enable global statusline (have a single statusline
                            -- at bottom of neovim instead of one for  every window).
                            -- This feature is only available in neovim 0.7 and higher.

                            グローバルステータスラインを有効にする
                            (各ウィンドウに1つではなく、neovim の下部に1つのステータスラインを表示する)。
                            この機能は、neovim 0.7以降で利用可能です。
これはデフォルトで無効になっているので有効化しましょう。
optionsの中に追記してください。
Check: options
ここまでで以下のように見た目の変化があるはずです。
| before | 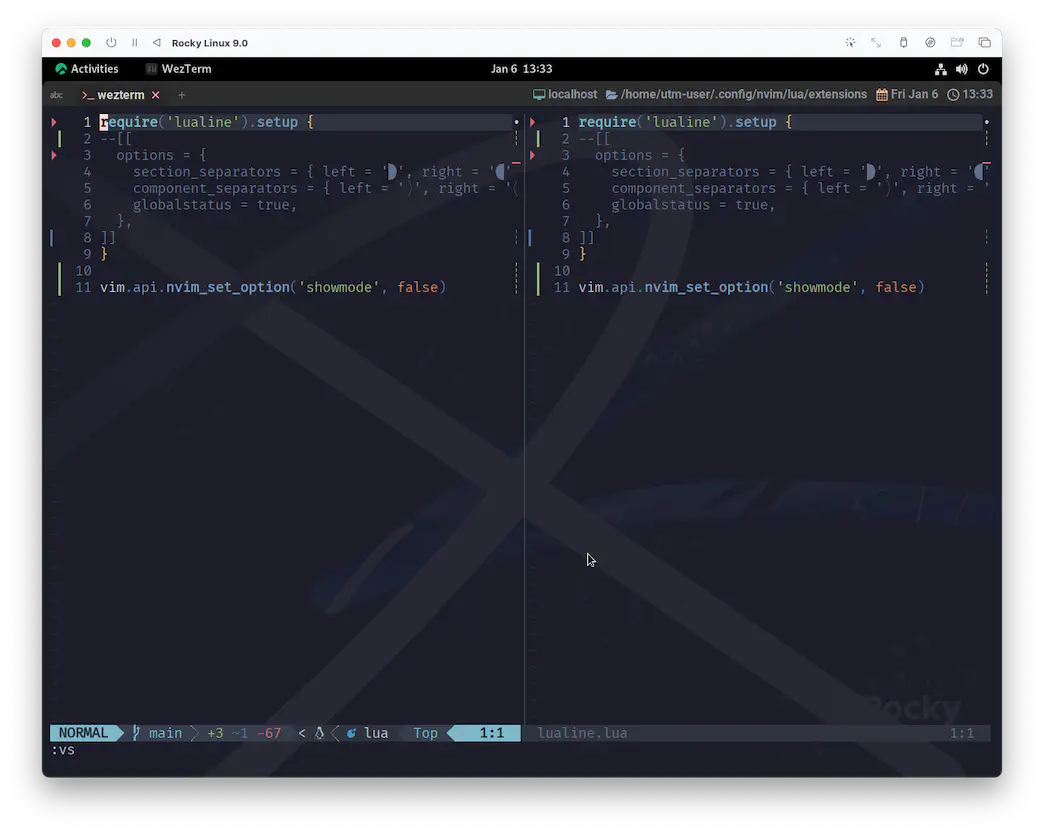 |
| after | 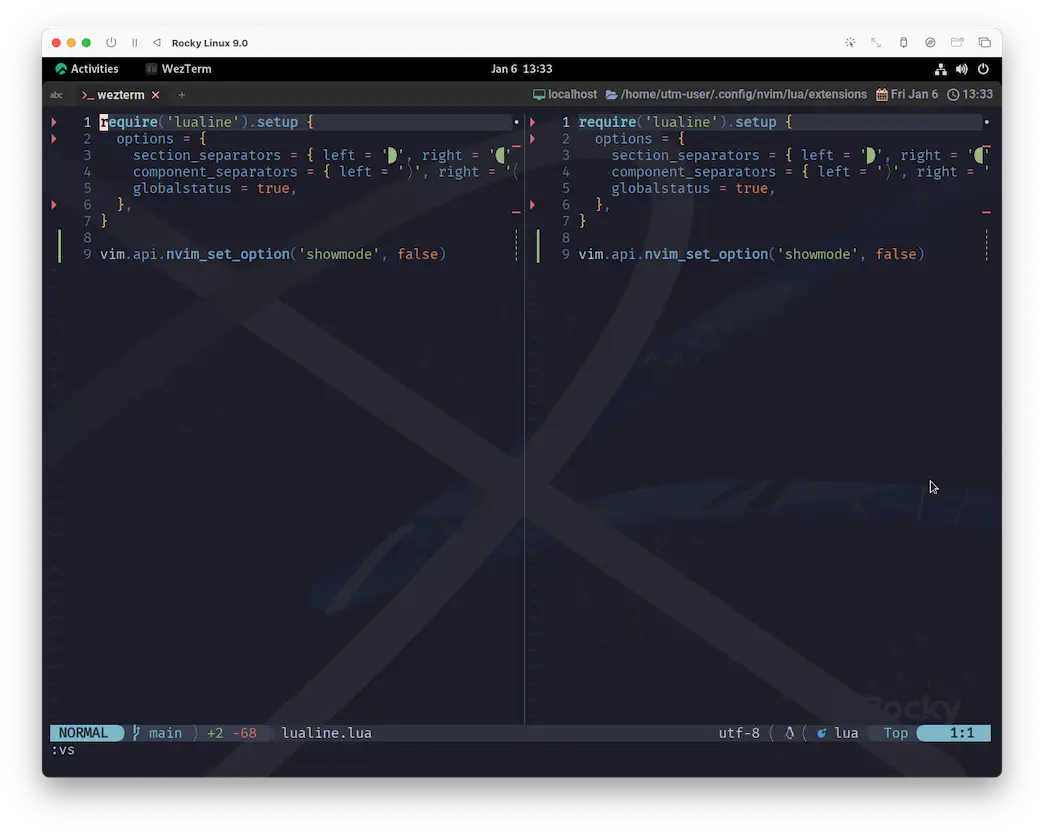 |
separatorsを変えることによって、ステータスラインがやわらか〜な印象になりましたね。
また、global statuslineによってウィンドウを分割してもステータスラインは常に一つだけが表示されるようになりました。
なんだか無理やり押し込まれたような窮屈な表示も解消されていて、とってもいい感じですね😆
Sections
さて、separators項で出てきたこれ。
Here, left refers to the left-most sections (a, b, c), and right refers to the
right-most sections (x, y, z).
Lualine has sections as shown below.
Lualineには以下のようなセクションがあります。

    +-------------------------------------------------+
    | A | B | C                             X | Y | Z |
    +-------------------------------------------------+

Each sections holds its components e.g. Vim’s current mode.
各セクションは、例えば Vim の現在のモードのような構成要素を保持します。
わかりやすいですね😉
この6つのセクションがsection_separatorで区分けされます。
ひとつのセクションの中に2つ以上の機能を入れて表示することもできます。
この場合はcomponent_separatorsで更に区分けされます。
statusline
じゃあ、とりあえずやってみましょう。わたしはこんなんしてます😉
-- onenord.nvim のカラーパレットを取得する
local colors = require('onenord.colors').load()
require('lualine').setup {
--options = {
-- (省略...)
--},
-- options と同列に並べてください。
sections = {
lualine_a = {
'mode',
},
lualine_b = {
{
'filename',
newfile_status = true,
path = 1,
shorting_target = 24,
symbols = { modified = '_', readonly = ' ', newfile = '' },
},
},
lualine_c = {},
lualine_x = {
'encoding',
},
lualine_y = {
{ 'filetype', color = { fg = colors.fg } },
},
lualine_z = {
{ 'fileformat', icons_enabled = true, separator = { left = '', right = '' } },
},
},
}
あらかわいい🥰
Components
なんとなく察しがつくかと思いますが、lualine_aがセクションAに対応しています。
B, C と X, Y, Z も同様です。
で、それぞれのセクションの最初にある文字列が機能(コンポーネント)を指定しています。
基本機能の一覧は次の通り。
branch(git branch)buffers(shows currently available buffers)diagnostics(diagnostics count from your preferred source)diff(git diff status)encoding(file encoding)fileformat(file format)filenamefilesizefiletypehostnamelocation(location in file in line:column format)mode(vim mode)progress(%progress in file)searchcount(number of search matches when hlsearch is active)tabs(shows currently available tabs)windows(shows currently available windows)
以下については、それぞれ詳細が示されています。
filename:h lualine-filename-component-optionsfiletype:h lualine-filetype-component-optionsfileformat:h lualine-fileformat-component-options
lualine_yのcolorsとか、lualine_zのseparatorとかは、それこそわたしの趣味です。
もうほんとに見た目だけ❗
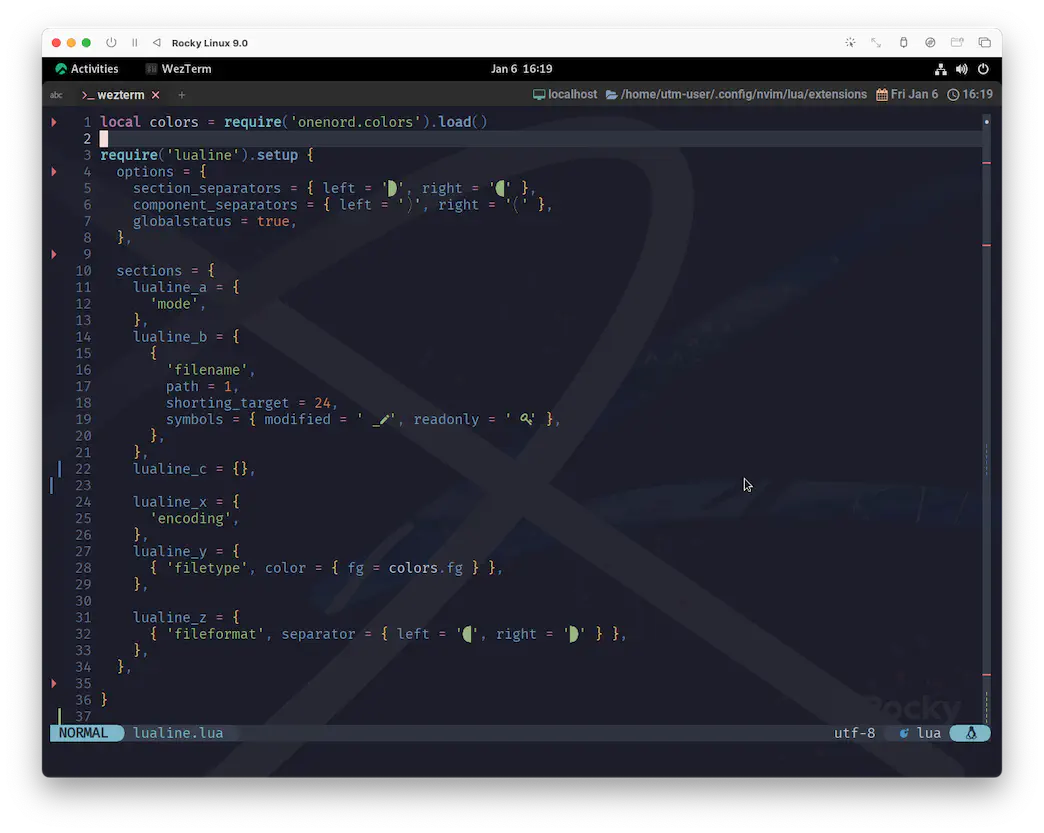
うん、こんな感じですね😉
lualine_cには、もう少し先で登場する予定のLSP
関連の情報を表示したいと思ってます。
イメージとしてはトップページのようになるので、 まだ見ぬ仲間の登場を楽しみにしておきましょう☺️
To Be Concluded…
lualine.nvimは…❗ なんと…❗
まだ続きます😮
やっぱりここはボリュームがありました…。 でも区切りとしてはとても自然だと思うので、やっぱり思い切ってもう一回だけ跨ぎます😆
次回、lualine.nvim PartⅢ に続く。続くったら続く…🐈🐈🐈
Is your name CoralPink?
君の名前は CoralPink?
Yeah.
ええ。
I’ve got something for you.
A letter.
君に渡したいものがあるんだ。
手紙だ。
A letter for me?
That’s impossible…
わたしに手紙?
そんなことあり得ない…。
You all right!? Need any help?
大丈夫なのか!? 助けが要るんじゃないか?
There’s only one man who can help me!!
わたしを助け出してくれるのは ただ一人だ!!
彼は 何者にもなれない人
何処でも無い場所に蹲り
誰も居ないのに 何処にも行き着かない計画を立てる
狭い視野しか持たないし
何処へ向かうのか判らない
なんだか少し ぼくたちに似てないか?
何者にもなれない人、聞いて欲しい
きみは見逃しているものを 知っていない
それでも、世界は君の意のままだ
彼は見えていない
見たいものしか 見えないんだ
なあ、きみにぼくは見えているんだろうか?
何者にもなれない人、心配は要らないよ
ゆっくり行こう、急ぐことはないんだ
誰かが手を差し伸べてくれるまで、全部放っておけばいい
狭い視野しか持たないし
何処へ向かうのか判らない
なんだか少し ぼくたちに似てないか?
何者にもなれない人、聞いて欲しい
きみは見逃しているものを 知っていない
それでも、世界は君の意のままだ
彼は 何者にもなれない人
何処でも無い場所に蹲り
誰も居ないのに 何処にも行き着かない計画を立てる
誰も居ないのに 何処にも行き着かない計画を立てる
誰も居ないのに 何処にも行き着かない計画を立てるんだ
Nowhere Man (by The Bealtes): 1965年10月の 21,22日に録音された “Nowhere Man” は、人生に方向性を持たず、真の世界観を持たない男を描いている。 The Beatles の楽曲で初めてロマンスや愛に全く関係のない曲となっており、Lennon の哲学的な傾向を持つ作詞作曲が行われた顕著な例である。
Lennon, McCartney, Harrison が三声のハーモニーで歌っており、リードギターソロは Harrison と Lennon がユニゾンで演奏した。 二人はこの曲で同一仕様の “ソニックブルー” のFender Stratocastersを使用している。
The Beatles の1966年アメリカツアー、および同年の ドイツ・日本・フィリピンツアー でも演奏された。
この曲は 1968年の映画Yellow Submarineにも登場し、 The Beatles が “nowhere land” で出会ったキャラクター、 Jeremy Hillary Boobについて歌っている。
Lennon は 1980年Playboy誌のインタビューでこう振り返っている: あの朝、意味のある良い曲を書こうと 5時間もかけていたんだが、ついに諦めて横になった。 そしたら “Norhere Man” が来た。歌詞もメロディも、全部が横になっている間に浮かんだんだ。
McCartney はこの曲についてこう語っている: 夜遊び明けの John が、夜明けを迎える瞬間に書いたんだ。 あの頃の彼は少し… 自分がどこへ向かっているのか迷っていたんだと思う。
Record World誌は、 米国シングル盤のレビューで、この曲を “自分らしくあろうとする勇気を持てない男の物語を描いた、味わい深い歌” と評した。 Wikipediaより
